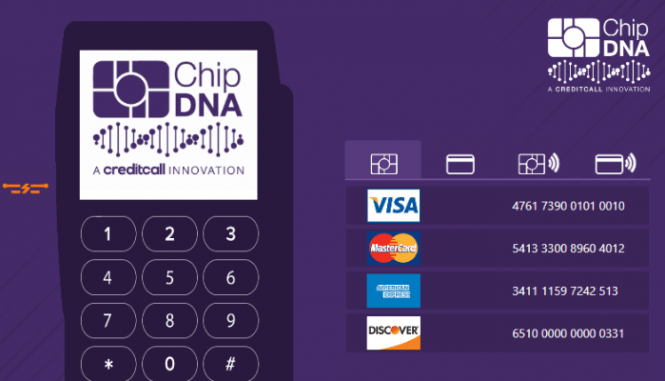
The Creditcall EMV Virtual Terminal is a convenient way to test your EMV implementation without requiring a physical EMV terminal.
Fortunately, the Creditcall EMV Virtual Terminal is designed to emulate an EMV terminal. This makes for a quick and affordable way to test EMV contact and contactless NFC payments in your application without purchasing EMV hardware.
In this article we’re going to cover how to use the Creditcall EMV Virtual Terminal with KioskSimple kiosk software.
Step 1: Register for a Creditcall WebMIS Sandbox Account
This article will cover how to use the Creditcall EMV Virtual Terminal with KioskSimple.
The first step is to register for a WebMIS sandbox account (aka test account) with Creditcall. This will allow you to make test transactions without actually charging your credit card.
Once you’ve completed the registration process you’ll receive an email with your WebMIS Terminal Id and Transaction Key.
Step 2: Install the KioskSimple Creditcall EMV Payment Gateway Plugin
The KioskSimple Creditcall EMV Payment Gateway Plugin allows you to access the Creditcall EMV payment gateway via the KioskSimple EMV JavaScript API.
If you haven’t done so already, download and install the free demo of KioskSimple.
Next run the KioskSimple Configuration Tool and navigate to the PLUGIN STORE.
Install the Creditcall EMV Payment Gateway Plugin. The configuration tool will restart and some dependencies will be installed.
You should now see a menu option called CARD READERS. Navigate there and select the Creditcall EMV Payment Gateway Plugin and then press CONFIGURE.
Step 3: Configuring the Creditcall EMV Virtual Terminal
The Creditcall EMV Payment Gateway Plugin comes pre-configured to work with the Creditcall EMV Virtual Terminal.
The only configuration necessary is to enter your WebMIS Terminal Id and Transaction Key under the Transaction Settings tab. As you can see in the screenshot below, the Terminal ID and Trans ID (Transaction Key) just need to be populated.
We’ve went ahead and included screen shots of the Device Settings and Server Settings tabs for your reference, but you shouldn’t need to change these values in order to use the Creditcall EMV Virtual Terminal.
Creditcall EMV Virtual Terminal Transaction Settings. The Terminal ID and Trans ID still need to be populated.
Creditcall EMV Virtual Terminal Device Settings
Creditcall EMV Virtual Terminal Server Settings
Step 4: Configuring KioskSimple to Show the Creditcall EMV Virtual Terminal
By default, KioskSimple blocks popup windows and 3rd party applications from running to ensure a smooth user experience at your kiosks or POS.
We’ll want to disable this feature in order to use the Creditcall EMV Virtual Terminal since it’s a 3rd party application.
This can easily be accomplished by changing the setting Enabling Closing Popup Windows to OFF as shown below.
Popup blocking disabled in KioskSimple
Now that we’ve configured KioskSimple to not block the Creditcall EMV Virtual Terminal we need an easy way to switch to it while KioskSimple is running.
I prefer to disable the filtering of the Windows hotkey ALT-TAB as shown below, which allows you to easily switch between open applications.
Disabling the ALT-TAB hotkey in KioskSimple
Step 5: Launching the Creditcall EMV Virtual Terminal
The Creditcall EMV Virtual Terminal gets installed automatically when you install the Creditcall EMV Payment Gateway Plugin in KioskSimple.
The Creditcall EMV Virtual Terminal is located here…
C:\ProgramData\RedSwimmer\KioskSimple\Plugins\8c43efed-7611-42ec-9942-874798728c88\ChipDNA Virtual PINpad\ChipDNAVirtualPINpad.exe
Running the Creditcall EMV Virtual Terminal
Step 6: Running an EMV Test Transaction in KioskSimple
Now you’re ready to test the Creditcall EMV Virtual Terminal with KioskSimple. The easiest way to do this is to run our Creditcall EMV JavaScript API example.Running a Creditcall EMV test transaction in KioskSimple
Once the example is setup, you can take the following steps to launch KioskSimple and run some EMV test transactions.
- Start KioskSimple.
- Select “Try the Demo” and then “Test Mode”.
- Now you’ll see the EMV JavaScript API website example shown above. Press “Get Status” and you should see the status of the Creditcall EMV Virtual Terminal. You can also enter a dollar amount and press “Start Authorization” to begin your transaction then ALT-TAB over to the Creditcall EMV Virtual Terminal.
- When you’re done press ESC and any password will work while KioskSimple is unregistered.
Got Questions?
Please contact us and we’ll get you up and running quickly. We offer free phone and email technical support for all of our code examples. Try finding that anywhere else in this industry.
We’re dedicated to making your next kiosk or POS project a success and are happy to hold your hand through the hardware integration.
- Self-Checkout Kiosks by FEC
- NRF Best Payment Kiosk Innovation Finalist – PopID Pay By Face – Facial Payment
- Retail Kiosk – Amazon Go Starbucks in NYC Video Walk-Thru
- NRF Kiosk – Evoke Best Customer Experience Award Candidate
- Embedded Intel Kiosk Computers – A Look At SDMs by Intel
- November Kiosk News
- First Responder Kiosk – Emergency Supply Lockers for “Stop the Bleed”
- Facial Payment – PopID and SoftBank to Launch PopPay In Japan – Wendy’s
- New Kiosk Model From Evoke Creative Supplier for McDonalds
- NRF Kiosk Award – Best Payment Innovation for Kiosk – PopID and NRF
- Public Safety Kiosk Includes Locker Solution – CR+M
- The Industry Group Website Announced
- Kiosk ADA — Call for Comments on Voting Kiosks
- Self-Checkout Kiosk for Grocery Stores Planned Rollout Huck’s
- KMA Kiosk Association Quarterly Call Wrapup
